If you’re a WordPress website owner, you probably understand the importance of periodically performing maintenance tasks to ensure your site runs smoothly and stays secure. Whether you’re updating plugins and themes, or making significant changes to your site’s design, it’s crucial to notify your visitors about the maintenance work being done. That’s where WordPress maintenance mode comes into play.
Maintenance mode is a feature that allows you to temporarily take your website offline while you perform necessary updates, upgrades, or modifications. It ensures that your visitors are informed about the maintenance activities and prevents them from encountering any broken pages or WordPress errors during the process.
In this blog, we will delve into all aspects of enabling WordPress maintenance mode on your WordPress website. Whether you’re a beginner or an experienced WordPress user, you’ll find valuable information and step-by-step instructions to implement this essential feature.
We will start by exploring the reasons why you might need WordPress maintenance mode for your website. From routine updates to major overhauls, we’ll discuss the scenarios where enabling maintenance mode is crucial. Understanding the importance of maintenance mode will help you communicate effectively with your visitors and maintain a positive user experience.
Next, we’ll walk you through various methods to enable WordPress maintenance mode. Whether you prefer using plugins, coding, or leveraging built-in features, we’ve got you covered. We’ll see the pros and cons of each method and provide detailed instructions to ensure a seamless implementation process.
Additionally, we’ll discuss customizing maintenance mode pages to match your website’s branding and style. You’ll learn how to create attractive and informative maintenance pages that keep your visitors engaged and informed about the progress.
So, if you’re ready to take control of your WordPress website’s maintenance process and provide a smooth experience to your visitors during downtimes. Let’s get started on creating a hassle-free maintenance experience for your WordPress website!
What Is WordPress Maintenance Mode?
WordPress Maintenance Mode is a feature that allows website owners to temporarily display a maintenance page or message to visitors while performing updates, upgrades, or making significant changes to their WordPress site. It ensures that visitors are aware that the website is undergoing maintenance and helps minimize any disruptions or confusion they may encounter.
When WordPress maintenance mode is enabled, instead of displaying the regular content of the website, visitors will see a designated maintenance page or a custom message. This page typically includes a message notifying visitors about the maintenance work being done, the expected duration of the maintenance, and any other relevant information you wish to convey. It can also include branding elements, such as your logo or website colors, to maintain consistency with your overall design.
Purpose Of Maintenance Mode
The purpose of Maintenance Mode is to facilitate the smooth execution of updates, upgrades, and modifications on a website while minimizing disruption to visitors. It serves several important functions that are beneficial for both website owners and their visitors. Let’s explore the purposes of Maintenance Mode in detail:
- Communication: Maintenance Mode allows website owners to effectively communicate with their visitors about the temporary unavailability of the site. By displaying a maintenance page or message, visitors are informed of the ongoing maintenance work, the expected duration of the downtime, and any other pertinent information. This helps manage visitor expectations and prevents confusion or frustration when encountering broken pages or errors.
- User Experience: Enabling Maintenance Mode helps maintain a positive user experience by preventing visitors from accessing incomplete or partially updated content. It ensures that visitors do not stumble upon broken links, missing images, or malfunctioning features that may occur during the update process. By displaying a maintenance page, website owners can provide a clean and informative experience, reducing any negative impact on user satisfaction.
- Data Integrity: During updates or modifications, there is a risk of data corruption or conflicts between old and new elements. Enabling Maintenance Mode restricts visitor access to the site, reducing the likelihood of data integrity issues. It allows website owners to make changes and perform updates safely, minimizing the chances of errors or data loss.
- Security: Maintenance Mode helps enhance the security of a website. By temporarily taking the site offline, it reduces the risk of potential vulnerabilities being exploited by malicious actors. It provides website owners with a controlled environment to implement security updates, patches, or other measures to protect their sites from potential threats.
- Branding and Customization: Maintenance Mode also offers an opportunity for branding and customization. Website owners can design a visually appealing maintenance page that aligns with their brand identity. It allows them to reinforce their brand message and maintain a consistent visual experience, even during downtimes.
- SEO Considerations: Enabling Maintenance Mode can be beneficial from an SEO perspective. Instead of visitors encountering broken pages or incomplete content, search engines are presented with a maintenance page that indicates the temporary unavailability of the site. This helps prevent negative impacts on search engine rankings and ensures a more favorable user experience.
Overall, the purpose of Maintenance Mode is to ensure a smooth and seamless maintenance experience for both website owners and visitors. By effectively communicating, managing user expectations, maintaining data integrity, enhancing security, and preserving brand identity, Maintenance Mode plays a vital role in maintaining a reliable and user-friendly website.
How To Enable WordPress Maintenance Mode?
Enabling WordPress maintenance mode can be achieved using different methods, depending on your preference and level of technical expertise. Here, we will discuss two popular methods: one using a plugin and the other without relying on a plugin.
Method 1: Using A Plugin (Recommended For Beginners)
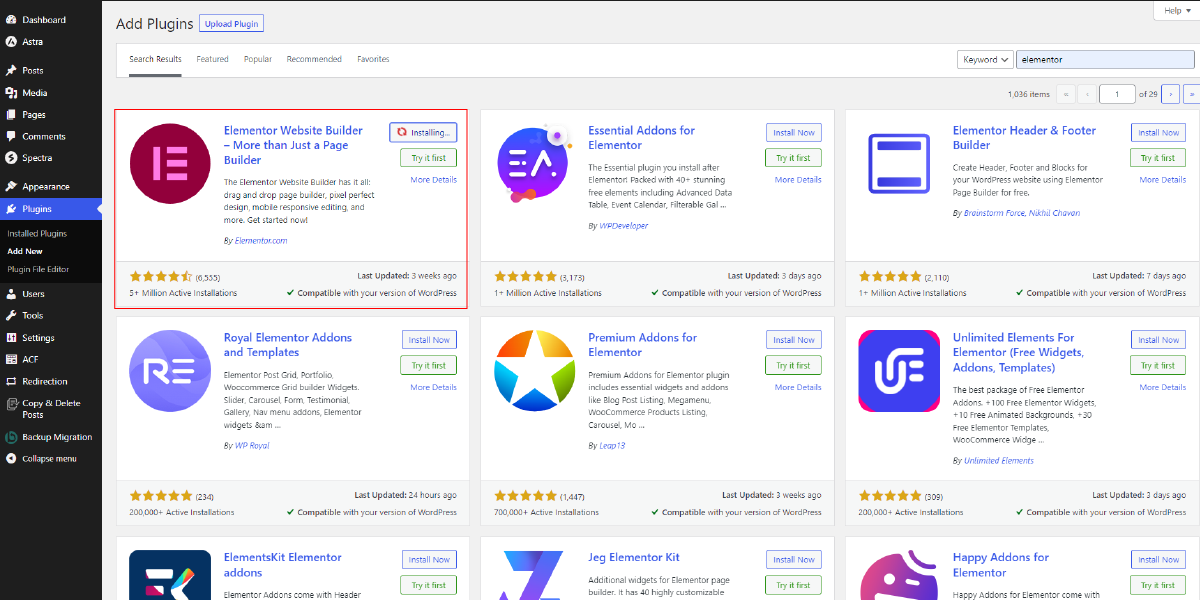
One of the most popular methods for enabling WordPress maintenance mode, especially for beginners, is by utilizing a WordPress Page Builder plugin like Elementor. Elementor is a powerful and user-friendly drag-and-drop page builder that allows you to design and customize your website without any coding knowledge. By using Elementor, you can create a visually appealing and informative maintenance page that will keep your visitors informed during the maintenance period.
Here’s a detailed step-by-step guide on how to enable WordPress maintenance mode using a page builder plugin like Elementor:
Step 1: Install and Activate Elementor Plugin
Start by installing and activating the Elementor plugin from the WordPress plugin repository. Once activated, you’ll be able to access the Elementor editor to design your maintenance page.
Step 2: Create a New Page
Go to your WordPress dashboard and navigate to “Pages” > “Add New” to create a new page. Give it a suitable title like “Maintenance Mode” or “Under Construction.”

Step 3: Access Elementor Editor
Click the “Edit with Elementor” button on the page edit screen. This will launch the Elementor editor, providing you with a visual interface to design your maintenance page.

Step 4: Design Your Maintenance Page
In the Elementor editor, you’ll have a wide range of design options at your disposal. Start by selecting a suitable template for your maintenance page from the available options or create a design from scratch.
You can add various elements to your maintenance page, such as headings, text blocks, images, countdown timers, contact forms, social media icons, and more. Customize these elements to display relevant information, such as the reason for maintenance, estimated downtime, and alternative means of contact.
Elementor allows you to easily drag and drop elements, resize them, change colors and fonts, and arrange the layout to create a visually appealing maintenance page that aligns with your website’s branding.

Step 5: Set Maintenance Page as Homepage
Once you’re satisfied with the design of your maintenance page, you need to set it as your website’s homepage temporarily. This will redirect all visitors to the maintenance page while you perform maintenance tasks.
To do this, go to the WordPress dashboard and select “Settings” > “Reading”. Select the option for a static page and choose the page you created as the “Front page” from the dropdown menu. Save your changes.

Step 6: Enable Maintenance Mode
At this point, your maintenance page is ready, and visitors will be directed to it when accessing your website. However, it’s essential to enable maintenance mode to prevent logged-in users, such as administrators, from seeing the maintenance page.
To enable WordPress maintenance mode, you can use a plugin like “Maintenance Mode” or “Coming Soon & Maintenance Mode by SeedProd.” Install and activate one of these plugins from the WordPress plugin repository and follow the instructions to configure and activate maintenance mode. These plugins typically provide options to exclude specific user roles from seeing the maintenance page, allowing administrators to access the site normally.

Step 7: Perform Maintenance Tasks
With your maintenance page and maintenance mode enabled, you can now safely perform necessary updates, upgrades, or modifications on your WordPress website. This includes tasks like updating plugins and themes, adding new features, optimizing the site’s performance, or making design changes.
Step 8: Disable Maintenance Mode
Once you’ve completed your maintenance tasks, it’s time to disable WordPress maintenance mode and make your website accessible to the public again. You can do this by deactivating the maintenance mode plugin or reversing the WordPress Settings within the plugin’s options.
Additionally, remember to change your website’s homepage back to its original state in the “Settings” > “Reading” section of your WordPress dashboard.
By following these steps, you can easily enable WordPress maintenance mode using a page builder plugin like Elementor. This method allows beginners to create visually stunning and informative maintenance pages without requiring any coding skills. It ensures that your visitors are informed about the maintenance activities and provides a professional and user-friendly experience during the downtime of your website.
Method 2: Manually Implementing Maintenance Mode (Advanced Users)
Another popular method to enable WordPress maintenance mode is by manually implementing it through coding. This method provides advanced users with more control and flexibility over the customization of the maintenance mode page. While it requires a basic understanding of coding and access to your website’s files, it allows for a highly personalized maintenance experience. Here’s a detailed step-by-step guide on how to manually implement maintenance mode using coding:
Step 1: Connect to Your Website’s Files
To begin, connect to your website’s files using FTP (File Transfer Protocol) or a file manager provided by your hosting provider. You will need access to the root directory of your WordPress installation.
Step 2: Create a Maintenance Page Template
Create a custom maintenance page template that will be displayed to visitors during the maintenance period. Start by creating a new PHP file in your theme’s directory, such as maintenance.php.
In this file, you can design your maintenance page using HTML, CSS, and even JavaScript to add interactive elements if desired. Customize the layout, add branding elements, and provide information about the maintenance activities. You can also include a countdown timer or a progress bar to keep visitors informed.
Step 3: Add Maintenance Mode Code
Open your theme’s functions.php file in a text editor. This file is located in the same directory as your theme’s files. Put the following code at the bottom of the file:
function custom_maintenance_mode() {
if ( ! current_user_can( ‘edit_themes’ ) || ! is_user_logged_in() ) {
wp_die( ‘Under Maintenance. Please check back soon.’, ‘Under Maintenance’, array( ‘response’ => 503 ) );
}
}
add_action( ‘get_header’, ‘custom_maintenance_mode’ );
This code creates a function named custom_maintenance_mode() that checks if the current user can edit themes and is not logged in. If these conditions are met, it triggers the WordPress wp_die() function, which displays a maintenance mode message with a 503 status code to inform visitors that the site is under maintenance. Depending on your needs, you can modify the message.
Step 4: Redirect Visitors to the Maintenance Page
To ensure that all visitors are redirected to the maintenance page, add the following code to the .htaccess file in your website’s root directory:
# Redirect all traffic to maintenance page except for the IP address specified
RewriteEngine On
RewriteCond %{REQUEST_URI} !^/maintenance\.php$
RewriteCond %{REMOTE_ADDR} !^123\.456\.789\.000 # Replace with your IP address
RewriteRule ^(.*)$ /maintenance.php [R=503,L]
In this code snippet, replace 123.456.789.000 with your IP address. This allows you to access the site during maintenance without being redirected to the maintenance page.
Step 5: Activate Maintenance Mode
To activate maintenance mode, upload the maintenance.php file and modify the .htaccess file as described in Steps 2 and 3. Once done, visitors will be redirected to the maintenance page whenever they try to access your website.
Step 6: Deactivate Maintenance Mode
After completing your maintenance tasks, you can deactivate maintenance mode by removing or commenting out the code added in Step 3 from the functions.php file. Additionally, remove the redirection code from the .htaccess file.
By following this manual coding method, you have full control over the design and functionality of your maintenance page. You can customize it to match your branding, provide detailed information, and add interactive elements to engage visitors during the maintenance period. Just remember to test the implementation thoroughly to ensure a seamless transition from maintenance mode to the regular site.
It’s important to note that when making modifications to your theme’s files or using manual coding methods, it’s highly recommended to create a backup of your website’s files and database beforehand. This ensures that you can easily revert any changes if needed and avoid potential issues during the maintenance mode implementation.
Conclusion
In conclusion, we have explored the ins and outs of WordPress maintenance mode, including how it can be applied to WordPress Elementor themes, in this ultimate guide. We learned about the importance of maintenance mode in ensuring the security, integrity, and user experience of your website. Whether you’re a beginner or an advanced user, we provided two comprehensive methods to enable maintenance mode.
For beginners, using a plugin offers a simple and user-friendly approach, allowing you to activate maintenance mode with just a few clicks. On the other hand, advanced users can opt for the manual coding method, providing more control and customization options for their maintenance page.
By understanding the purpose of WordPress maintenance mode and implementing the appropriate method, you can seamlessly carry out updates, upgrades, or modifications while keeping your visitors informed and maintaining a positive user experience.
Now armed with this knowledge, you have the tools to confidently enable WordPress maintenance mode and ensure a smooth and professional website maintenance process. Remember to communicate transparently with your visitors, provide informative maintenance pages, and always prioritize the security and integrity of your WordPress website.