When it comes to managing your WordPress website, every detail counts. From the overall design and functionality to the tiniest element, you want your website to reflect your brand’s identity and provide a seamless user experience. One often overlooked aspect is the login page. While it may seem insignificant, the login page is the gateway to your website for both you and your users. So why settle for a bland and generic login page when you can customize it to match your brand?
That’s where Elementor Login Widget comes into play. Elementor, a popular WordPress page builder plugin, offers a powerful tool that allows you to take complete control over your login page’s appearance and functionality. Whether you want to add your brand’s logo, change the background image, or even create a multi-step login process, Elementor Login Widget has got you covered.
In this blog, we will delve into the world of the Elementor Login Widget and explore its features in depth. We will guide you through the process of installing and configuring the plugin, showcase some inspiring examples of customized login pages, and provide tips and tricks to make the most out of this powerful tool.
So, if you’re ready to take your WordPress login page to the next level. Let’s transform your login page into a visually appealing and brand-consistent experience with Elementor Login Widget.
What Exactly Is An Elementor Login Widget?
Elementor Login Widget is a powerful feature offered by Elementor, a popular page builder plugin for WordPress. It allows you to customize the login page of your WordPress website using a drag-and-drop interface, without the need for coding knowledge or hiring a developer.
Traditionally, the default WordPress login page has a generic design with the WordPress logo and a simple login form. However, Elementor Login Widget takes customization to a whole new level by providing a range of options to personalize every aspect of the login page.
With Elementor Login Widget, you have the freedom to:
- Design the layout: Using the intuitive drag-and-drop editor, you can create a visually appealing login page by arranging and styling the elements. You can choose the position and size of the login form, add a background image or color, and adjust the spacing and alignment.
- Add branding elements: Elementor Login Widget allows you to incorporate your brand’s logo, tagline, or any other branding element into the login page. This helps in maintaining a consistent visual identity across your website.
- Customize form fields: You can modify the login form fields by adding or removing them according to your needs. You can also rearrange their order and set specific validation rules.
- Apply design styles: The plugin provides a wide range of design options, such as choosing fonts, colors, and button styles, to match your website’s overall aesthetic. You can even apply custom CSS to achieve a unique look.
- Enable social login: Elementor Login Widget supports integration with popular social media platforms like Facebook, Google, and Twitter. This allows users to log in to your website using their existing social media accounts, making the login process more convenient for them.
- Implement multi-step login: With Elementor Login Widget, you can create a multi-step login process that includes additional forms or steps. This can be useful for websites that require additional user information or authentication layers.
By utilizing Elementor Login Widget, you can transform your WordPress login page into a visually appealing and user-friendly experience that aligns with your brand’s identity. It enhances the aesthetics and improves the overall user experience, making it easier for visitors to access your website.
How To Set Up A Login Page With Elementor Login Widget?
To set up a Login page with the Elementor Login Widget, you will need Elementor Pro, which is an advanced version of the Elementor page builder plugin for WordPress. Here’s a step-by-step guide on how to set it up.
Step 1: Install And Activate Elementor Pro
To set up a login page with the Elementor Login Widget, the first step is to install and activate Elementor Pro. If you have already installed the basic Elementor plugin on your WordPress website, you can proceed to the next step.
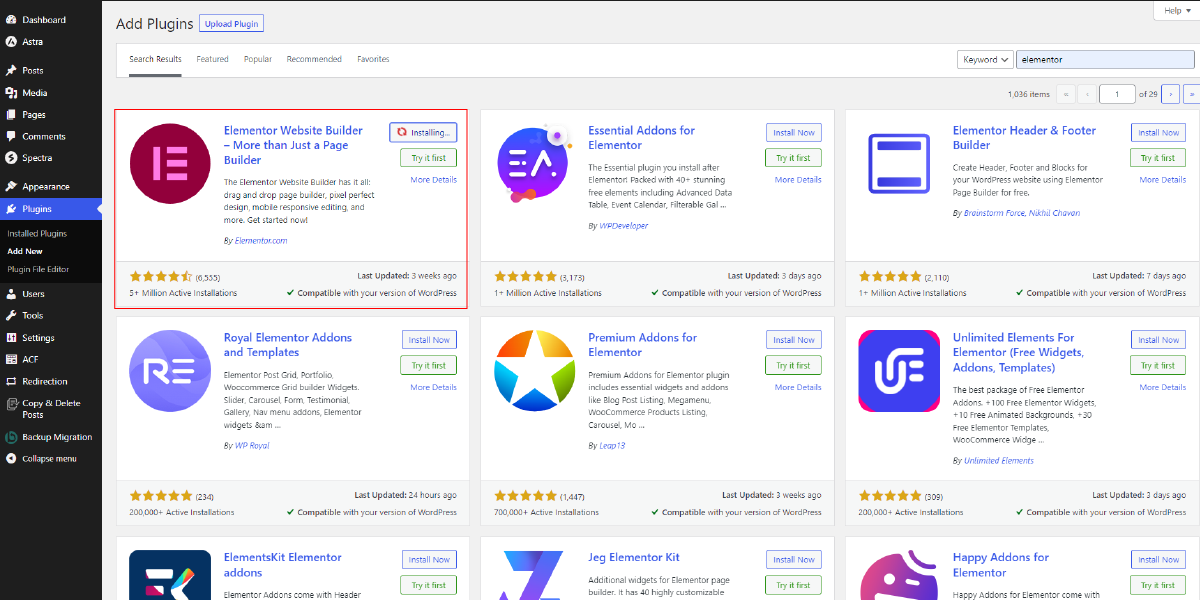
To begin, navigate to the plugin dashboard in your WordPress admin panel. Look for the “Elementor” plugin among your installed plugins. If you don’t see it, you may need to search for and install it from the WordPress plugin repository.
Once you locate the Elementor plugin, you will find an option to get Elementor Pro. Click on this option, and it will redirect you to the Elementor Pro Plans page. Here, you will see different subscription plans available for Elementor Pro.
Take a moment to review the plans and select the one that suits your needs. Elementor Pro offers various features and benefits depending on the plan you choose, such as additional widgets, theme builder functionality, WooCommerce integration, and more. Consider your requirements and budget to make an informed decision.
After selecting a plan, you can proceed with the payment process. Elementor Pro is a premium plugin, so you will need to purchase a subscription to access its advanced features. The payment process typically involves providing your billing information and completing the transaction.
Once you have completed the purchase, you will receive a confirmation email containing your Elementor Pro license key. Make sure to keep this key handy as you will need it for the installation and activation process.
Return to your WordPress website and navigate to the plugin dashboard again. Locate the Elementor plugin, but this time, instead of the “Get Elementor Pro” option, you should see an “Upload Plugin” button. Click on it, and a file upload form will appear.
Click the “Choose File” button on the upload form and browse your computer for the Elementor Pro plugin file that you downloaded after purchasing the subscription. Select the file and click “Install Now” to upload and install Elementor Pro.
A success message will appear once the installation is complete. Now, you can activate Elementor Pro by clicking the “Activate Plugin” button. The activation process will prompt you to enter the license key you received via email earlier. Enter the license key in the designated field and click the “Activate” button.
If everything is done correctly, Elementor Pro will be successfully installed and activated on your WordPress website. You can now start exploring the additional features and widgets provided by Elementor Pro, including the Login Widget that you can use to create a customized login page for your website.
Step 2: Create A New Page And Click On Edit The Page With Elementor

After successfully installing and activating Elementor Pro, the next step in setting up a login page is to proceed to your WordPress dashboard. Locate the “Pages” option in the sidebar menu and click on “Add New” to create a new page specifically dedicated to the login functionality.
Now that the new page is created, look for the “Edit with Elementor” button, typically situated at the top of the page editor. By clicking on this button, you will be taken to the Elementor editor interface, which allows for intuitive customization and design.
Once inside the Elementor WordPress Content Editor, you can take advantage of the vast array of widgets and elements available.
Step 3: Drag And Drop The Login Widget

To set up a Login page, you need to locate the “Login” widget in the left panel of the editor. The left panel contains a list of available widgets categorized for ease of navigation.
To find the “Login” widget, scroll through the widgets list or use the search bar to quickly locate it. Once you have located the widget, simply click on it and drag it to the desired section on your page. Elementor allows you to drag and drop widgets into different sections of your page, giving you the flexibility to design and customize your Login page layout as per your preferences.
By dragging the “Login” widget to the desired section, you will be able to visually position and align it within your page’s content. This drag-and-drop functionality simplifies the process of creating a Login page, eliminating the need for complex coding or technical expertise. Once the widget is in place, you can further customize its appearance, functionality, and styling options using the Elementor editor’s settings and options.
Step 4: Customize The Login Form

Once you have added the Login Widget to your Elementor page, the next step is to customize it to suit your preferences and align it with the overall design of your website. The customization options provided by Elementor empower you to modify various elements of the login form.
Firstly, you can adjust the fields within the login form. For instance, you may want to add or remove fields such as username, email, or password. This flexibility allows you to tailor the login form based on the specific requirements of your website and the information you wish to collect from your users.
In addition to modifying the fields, you can also customize the labels associated with each field. This enables you to provide clear instructions and guidance to your users, making the login process more intuitive. Whether you prefer traditional labels like “Username” and “Password” or you want to add a personal touch with custom labels, Elementor allows you to easily make these changes.
Furthermore, Elementor gives you the ability to customize the button text for the login form. You can choose to keep the default text such as “Login” or “Sign In,” or you can get creative and use different phrases that align with your website’s branding or tone. This small detail can make a significant impact on the overall user experience and create a cohesive look and feel.
To make your login page visually appealing and consistent with the rest of your website, Elementor offers a wide range of styling options. You can customize the colors, fonts, and sizes of various elements within the login form, ensuring that it seamlessly integrates with your website’s overall design. This level of customization helps you maintain a cohesive and professional appearance throughout your site.
Moreover, Elementor allows you to enhance your login page further by incorporating other widgets. For example, you can add your site logo to the login form, providing users with a familiar visual element and reinforcing your brand identity. By leveraging these additional widgets, you can create a cohesive and visually appealing login page that aligns with your website’s design language.
Step 5: Publish The Page

After customizing the login form using the Elementor Login Widget, the next step is to save and publish the page. Once you are satisfied with the changes made to the login form and have configured the desired options, locate the “Publish” button, usually located at the top-right corner of the Elementor interface. Click on this button to save your modifications.
A prompt may appear, reminding you to review the page before publishing it. Take this opportunity to carefully inspect the login page, ensuring that everything appears as intended. Once you are confident with the outcome, proceed by clicking the “Publish” button again to make the login page live and accessible to users.
Step 6: Set The Login Page As The Default Login Page
To set the login page created with Elementor Login Widget as the default login page in WordPress, you need to follow a few steps. After creating and customizing your custom login page, you can make it the default login page by implementing a simple code snippet or by using a WordPress plugin. Let’s go through each method in detail.
Method 1: Implementing a Code Snippet
To set the login page created with Elementor Login Widget as the default login page on WordPress, you can use a code snippet. An overview of how this method works is provided below:
- Open your WordPress dashboard and navigate to the “Appearance” section, then click on “Theme Editor.”
- In the Theme Editor, you’ll see a list of theme files on the right side. Locate and click on the “functions.php” file. This file is responsible for adding custom functions to your WordPress theme.
- Before making any changes, it’s essential to create a backup of your theme’s functions.php file. You can do this by copying the entire code and saving it in a text editor.
- Once you have a backup, scroll down to the bottom of the functions.php file and add the following code snippet:
function redirect_login_page(){
$login_page = home_url( ‘/your-custom-login-page-slug/’ );
$page_viewed = basename($_SERVER[‘REQUEST_URI’]);
if( $page_viewed == “wp-login.php” && $_SERVER[‘REQUEST_METHOD’] == ‘GET’) {
wp_redirect($login_page);
exit;
}
}
add_action(‘init’,’redirect_login_page’);
- Make sure to replace /your-custom-login-page-slug/ in the code above with the actual slug of your custom login page. This is the part of the URL that comes after your website’s domain name.
- After adding the code snippet, click on the “Update File” button to save the changes made to the functions.php file.
The default WordPress login page (wp-login.php) will now automatically redirect users to your customized login page created with Elementor Login Widget.
Method 2: Using a WordPress Plugin (LoginWP)
Alternatively, you can use a WordPress plugin called LoginWP (formerly Peter’s Login Redirect) to set your custom login page as the default login page. Here’s how to do it:
- Go to the “Plugins” section of your WordPress admin dashboard. To install a plugin, click on “Add New”.
- In the search bar, type “LoginWP” and press Enter. Look for the LoginWP plugin (formerly Peter’s Login Redirect) in the search results.
- Click on the “Install Now” button next to the LoginWP plugin, and once it’s installed, click on “Activate” to activate the plugin.

- After activating the plugin, you’ll find a new menu item called “LoginWP” in your WordPress dashboard. Click on it to access the plugin settings.
- In the LoginWP settings page, you’ll see various options to customize the login page behavior. Locate the “Redirect URL” section.
- In the “Redirect URL” field, enter the URL of your custom login page created with the Elementor Login Widget.
- Click on the “Save Changes” button to save your settings.

With LoginWP configured, your custom login page will now be set as the default login page for your WordPress website. Users accessing the default WordPress login page (wp-login.php) will be automatically redirected to your custom login page.
Using either Method 1 or Method 2, you can successfully set the login page created with Elementor Login Widget as the default login page on your WordPress website. This ensures that users are directed to your custom login page instead of the default WordPress login page when accessing the login URL.
After implementing either method, make sure to test the login functionality to ensure that users are redirected to your custom login page successfully. You can log out of your WordPress account or open a private browsing window to check the login page redirection.
Conclusion
In conclusion, customizing your WordPress login page with Elementor Login Widget offers a simple and effective way to create a personalized and professional login experience for your website visitors. By utilizing the drag-and-drop functionality of Elementor, you can design a login page that aligns with your brand identity and enhances user engagement.
We have explored the process of setting up a login page with the Elementor Login Widget, including creating and customizing the page layout. Whether you choose to implement a code snippet or utilize a plugin like LoginWP, you can easily set your custom login page as the default login page, ensuring a seamless user experience from the moment visitors arrive at your website. With a wide range of WordPress Elementor themes available, you can further enhance your website’s overall design and aesthetics, making it an inviting and visually appealing platform for your users.