
As the online marketplace continues to grow and evolve, it's becoming increasingly important for businesses to find ways to stand out and engage their audiences. One way to do this is by customizing the display of your posts or products on your website. A visually appealing display can capture your audience’s attention and enhance their overall experience on your website.
Elementor, the popular WordPress page builder, has recently released a new Loop Carousel widget that makes it easy to customize the display of your posts or products. This new widget allows you to create a dynamic carousel of your posts or products, with a range of customization options to make it fit seamlessly into your website's design.
With the new Loop Carousel widget, you can choose to display your posts or products in a variety of ways, including a grid, a list, or a slider. You can also customize the layout, colors, and typography to match your website's branding and style. This allows you to create a cohesive and visually appealing display that enhances the user experience.
In addition to the aesthetic benefits of customizing your post or product display, there are also practical benefits to consider. By organizing your content in a visually appealing way, you can make it easier for your audience to find what they're looking for, and increase the likelihood that they'll engage with your content. This can lead to increased conversions, whether that's making a purchase, signing up for a newsletter, or simply spending more time on your website.
In this blog post, we'll take a closer look at how to use Elementor's new Loop Carousel widget to customize the display of your posts or products. We'll cover the various customization options available, as well as some tips and best practices for creating an engaging and effective display. By the end of this post, you'll be equipped with the knowledge and tools you need to take your website's post or product display to the next level.
What Is Elementor’s New Loop Carousel Widget?
Elementor's New Loop Carousel Widget is a powerful new tool that allows website owners to display their posts, custom posts, or products in a visually engaging way. With the Loop Carousel, you can display the listings of your content in an infinite looping carousel format, instead of a traditional grid or list format. This means that your audience can easily scroll through your content, without the need to click through to different pages or sections.
One of the key benefits of the Loop Carousel is its versatility. You can use it to display a wide range of content, including blog posts, product listings, portfolio items, and more. The widget allows you to choose from a variety of display options, including grid, list, and slider formats. You can also customize the layout, colors, and typography to match your website's branding and style.
Another key feature of the Loop Carousel is its ease of use. You don't need any coding knowledge to create a dynamic carousel of your content. Instead, you can simply drag and drop the Loop Carousel widget onto your page or post, and customize it using the intuitive Elementor interface. This makes it a great option for website owners who want to create a visually engaging display of their content without hiring a developer or learning how to code themselves.
In addition to its visual appeal and ease of use, the Loop Carousel also offers practical benefits for website owners. Organizing your content in a dynamic carousel can make it easier for your audience to find what they're looking for. This can lead to increased engagement and conversions, whether that's making a purchase, signing up for a newsletter, or simply spending more time on your website.
Overall, Elementor's New Loop Carousel Widget is a powerful tool that can help website owners create a visually engaging and effective display of their posts, custom posts, or products. With its range of customization options and ease of use, the Loop Carousel is a great option for anyone looking to enhance their website's user experience and engagement.
How To Create And Customize Loop Carousels?
Let’s walk through the steps to create and customize a loop carousel with Elementor's Loop Carousel widget, as well as the steps to create a custom template for the loop carousel. Here are the detailed steps.
Step 1: Install And Activate Elementor
To create and customize a loop carousel using Elementor's Loop Carousel widget, you'll first need to install and activate Elementor on your WordPress site.
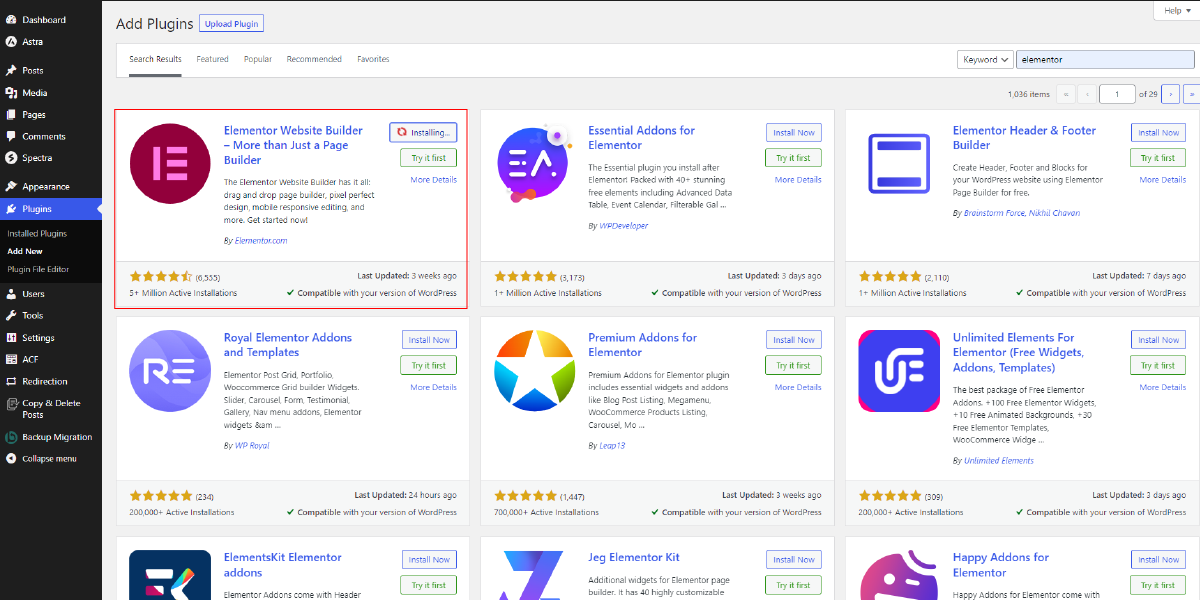
To install Elementor, start by logging in to your WordPress dashboard and navigating to the Plugins menu. From there, click on the Add New button at the top of the screen. In the search bar, type in "Elementor" and hit enter. This will bring up a list of search results, and you should see the Elementor Page Builder plugin listed at the top. Click on the Install Now button next to the Elementor plugin, and wait for the installation to complete.
Once the Elementor plugin is installed, click on the Activate button to activate the plugin on your WordPress site. Once activated, you'll be able to access the Elementor editor by clicking on the Edit with Elementor button when editing a page or post in WordPress.
With Elementor installed and activated, you're now ready to start creating and customizing your loop carousel using the Loop Carousel widget.
Step 2: Add The Loop Carousel Widget

Once you have successfully installed and activated Elementor on your WordPress site, the next step in creating and customizing a loop carousel with Elementor's Loop Carousel widget is to add the widget to your page.
To do this, open the page you want to add the loop carousel to in Elementor by clicking on the Edit with Elementor button. From there, find the Loop Carousel widget in the Elementor widget panel on the left-hand side of the screen.
You can either search for the Loop Carousel widget using the search bar, or you can navigate to it by expanding the Posts widget category. Once you have found the Loop Carousel widget, drag it onto the canvas area in the center of the screen where you want it to appear.
Once the Loop Carousel widget has been added to your page, you can begin customizing it to suit your needs. In the Loop Carousel settings panel, you can customize the number of slides to display, the slide order, the slide behavior, and other settings.
Step 3: Configure The Loop Carousel Widget

After adding the Loop Carousel widget to your page in Elementor, the next step is to configure the widget according to your specific needs. This involves customizing the layout, selecting the query criteria, adjusting the settings, and choosing navigation and pagination options. By following these steps, you can create a loop carousel that is tailored to your unique content and design preferences.
The first step in configuring the Loop Carousel widget is to choose the layout. You can either edit the existing layout or create a custom layout by clicking on the Edit Layout button in the Loop Carousel settings panel. This will redirect you to another page where you can set up which sections you want in your carousel. You can choose from various sections such as Title, Featured Image, Excerpt, and Meta Data, and drag them to the canvas area to create your custom layout. You can also adjust the width and height of each section, as well as the spacing between them, to create the desired look and feel for your loop carousel.
Once you have set up your layout, the next step is to choose the query criteria for which posts or custom post types to display. In the Query section of the Loop Carousel settings panel, you can select specific categories, tags, or post IDs to display, or you can choose to display all posts or custom post types. You can also set the number of posts to display per slide and the order in which they are displayed, such as by date, title, or random.
After selecting your query criteria, you can adjust the settings for the Loop Carousel widget. In the Settings section, you can choose whether to enable Autoplay, set the Scroll Speed (ms), enable Pause on hover or interaction, enable Infinite scroll, and set the Transition Duration (ms) and Direction. These settings allow you to control the behavior and animation of the loop carousel, creating a seamless and engaging user experience.
The next step is to choose the navigation options for the loop carousel. In the Navigation section of the Loop Carousel settings panel, you can choose whether to display navigation arrows, dots, or both. You can also customize the color, size, and position of the navigation elements to match the design of your website. This allows users to easily navigate through the carousel and find the content they are interested in. If you are looking for amazing website designs with easy loop carousals you can look for the WordPress theme bundle by WP Elemento, they provide the best WordPress themes design to meet the customers needs.
Finally, you can choose whether to enable pagination for the loop carousel. In the Pagination section of the Loop Carousel settings panel, you can choose whether to display page numbers or a progress bar and customize the color, size, and position of the pagination elements. Pagination allows users to quickly jump to a specific slide in the loop carousel, improving usability and navigation.
Step 4: Customize The Loop Carousel Widget

After configuring the Loop Carousel widget in Elementor, the next step is to customize the widget according to your specific design preferences. This involves making adjustments to the layout, motion effects, transform options, background, border, mask, responsive settings, attributes, and Elementor Custom CSS. By following these steps, you can create a loop carousel that is uniquely tailored to your website design and branding.
The first customization option is the Layout tab. Here, you can adjust the width and height of the loop carousel, as well as the alignment and position of the content within each slide. You can also adjust the spacing between slides, the padding of each section, and the border radius of the carousel. These settings allow you to fine-tune the layout of the loop carousel and ensure that it fits seamlessly into your website design.
Next, you can customize the Motion Effects of the loop carousel. This includes settings for Parallax, Vertical Scrolling, Horizontal Scrolling, and Mouse Move. These effects create an engaging and interactive user experience, allowing the carousel to move and respond to user actions. By adjusting the intensity and direction of these motion effects, you can create a dynamic and eye-catching loop carousel that captures the attention of your audience.
The Transform tab allows you to make more advanced adjustments to the appearance and behavior of the loop carousel. This includes settings for Rotate, Scale, Skew, and Translate. By adjusting these settings, you can create a loop carousel that is truly unique and visually stunning. For example, you can add a 3D effect to the carousel or create a dynamic animation that brings the content to life.
The Background tab allows you to customize the background of the loop carousel. There are settings for color, gradient, image, and video included here. You can also adjust the opacity, blend mode, and background size to create a background that complements the content of the loop carousel. This setting is especially useful for creating a cohesive and visually appealing design that aligns with your brand identity.
The Border tab allows you to add a border to the loop carousel. You can adjust the border type, color, and width, as well as the border radius, to create a border that fits seamlessly into your website design. This setting is useful for creating a visual hierarchy and separating the loop carousel from other elements on the page.
The Mask tab allows you to add a mask to the loop carousel. This includes settings for shape, image, and gradient. By adjusting the mask settings, you can create a unique and visually interesting effect that draws the eye to the content of the loop carousel.
The Responsive tab allows you to adjust the display settings of the loop carousel for different screen sizes. This includes settings for tablet, mobile, and desktop. By adjusting the display settings for each device, you can ensure that the loop carousel looks and functions properly on all devices, improving the user experience and engagement.
The Attributes tab allows you to add custom HTML and CSS to the loop carousel. This is useful for adding additional functionality or styling to the carousel that is not available through the standard Elementor settings. For example, you can add custom animations or interactive elements to the carousel to create a more engaging and immersive user experience.
Finally, the Custom CSS tab allows you to add custom CSS code to the loop carousel. This is useful for making advanced styling adjustments that are not available through the standard Elementor settings. By adding custom CSS, you can create a loop carousel that is truly unique and fits seamlessly into your website design.
Step 5: Preview And Publish

After customizing your Loop Carousel widget, it is important to preview your work to ensure that it looks the way you want it to. You can preview your work by clicking on the "Preview" button located on the bottom left of the Elementor editor. This will open a new window where you can see how your Loop Carousel widget looks on different devices such as desktops, tablets, and mobile.
If you are happy with the preview, you can then proceed to publish your Loop Carousel widget. To do this, simply click on the "Publish" button located on the bottom left of the Elementor editor. You will be presented with a few publishing options, such as setting the visibility of your widget and whether you want to apply the changes to the entire site or just the current page. Once you have made your selections, click on the "Publish" button to make your Loop Carousel widget live.
Conclusion
In conclusion, Elementor's new Loop Carousel widget, combined with WordPress Elementor Themes, provides website owners with a powerful tool to customize the display of their posts or products. With its user-friendly interface and customizable options, it enables users to create stunning and dynamic carousels that enhance the visual appeal of their website.
By following the step-by-step process outlined in this article, you can create and customize your own Loop Carousel widget, tailored to your specific needs and preferences. Whether you're a blogger, an e-commerce website owner, or simply looking to enhance the visual appeal of your website, the Loop Carousel widget is an excellent option to consider. With Elementor's continued innovation and commitment to providing users with the best possible design tools, you can be sure that the Loop Carousel widget will continue to evolve and improve in the years to come.

