
Creating a stunning landing page is a pivotal step in boosting your website's engagement, capturing leads, and driving conversions. Whether you're promoting a product, launching a new service, or building your personal brand, a well-designed landing page can be a game-changer. But how do you create one without diving deep into coding or hiring a designer? The answer: Elementor.
Elementor is one of the most popular page builders for WordPress, known for its intuitive drag-and-drop interface and powerful features. With Elementor, you can design custom landing pages with ease, incorporating eye-catching visuals, interactive elements, and compelling calls to action.
In this guide, we'll walk you through the process of creating a Landing pages with Elementor in WordPress. From installing the plugin to choosing a template, customizing your design, and optimizing for conversions, we'll cover everything you need to know to build a landing page that not only looks great but also achieves your business goals.
Ready to get started? Let's dive in and create a Landing Page in Elementor that stands out and converts!
What exactly is a Landing Page? Why Is It Different from a Website?

A landing page is a standalone web page designed with a specific focus in mind, often centered on driving a particular action from visitors. Unlike a full-fledged website, which typically contains multiple pages with a range of content such as about, services, blog, and contact, a landing page serves a unique purpose, typically tied to a marketing or advertising campaign.
The primary objective of a landing page is conversion, which could be anything from collecting user information (like email addresses for a Elementor newsletter popup), promoting a specific product or service, or encouraging users to sign up, download, or purchase. Its design, content, and structure are streamlined to guide visitors towards a singular goal without distractions, helping increase conversion rates.
Landing pages differ from a typical website in their simplicity and focus. While a website often provides comprehensive information about a company or individual, a landing page is narrower in scope. It might feature a compelling headline, a brief explanation of the product or service, supporting visuals, customer testimonials, and a clear call to action. Everything on the landing page is designed to lead the user to take a specific action.
Additionally, landing pages are often used in conjunction with marketing campaigns, such as pay-per-click (PPC) advertising, email marketing, or social media promotions. They serve as a destination for users who click on an ad or a promotional link, ensuring a seamless transition from the marketing message to the intended action. This tailored approach can significantly boost the effectiveness of marketing efforts, as visitors are directed to a page designed explicitly to engage and convert them, without the distractions or navigation options typically found on a broader website.
Benefits of Creating a Landing Page Over Creating Full-Fledged Website
Creating a landing page instead of a full-fledged website can offer several unique benefits, particularly when you're focusing on specific marketing objectives. Here are the key advantages:
- Singular Focus for Higher Conversion Rates Landing pages are designed with a single, well-defined goal, whether it's capturing leads, promoting a product, or driving sales. This focused approach helps visitors understand the purpose of the page quickly and clearly, leading to higher conversion rates. In contrast, full-fledged websites typically have multiple goals and can be overwhelming with various sections, navigation menus, and diverse content, potentially causing visitors to lose focus.
- Enhanced User Experience With a landing page, the user experience is simplified and straightforward. The streamlined design and minimal navigation reduce the cognitive load on visitors, allowing them to concentrate on the central message and call to action. By eliminating distractions such as additional links, sidebars, or complex menus, landing pages can guide visitors more effectively towards the intended outcome.
- Faster Load Times Landing pages are generally lighter in terms of content and design elements, which can result in faster load times compared to a full-fledged website. A faster-loading page improves the user experience and reduces bounce rates, as visitors are less likely to abandon a page if it loads quickly. This speed advantage can also positively impact search engine rankings, as page load time is a known factor in SEO.
- Better SEO for Specific Campaigns Landing pages can be optimized for specific keywords and campaigns, allowing for targeted SEO strategies. Because landing pages are typically tied to a particular marketing effort, you can focus on relevant keywords and tailor the content to align with those terms. This targeted approach can improve search engine visibility and attract a more qualified audience, leading to better campaign results.
- Cost-Effective and Time-Efficient Creating a landing page is often more cost-effective and time-efficient than building a full-fledged website. A landing page's simplified structure means less time is needed for design and development, and the maintenance requirements are minimal. This cost and time efficiency make landing pages an attractive option for short-term campaigns or for testing specific marketing ideas without investing heavily in a complete website.
- Easy A/B Testing and Optimization Landing pages are ideal for A/B testing, allowing marketers to experiment with different headlines, images, call-to-action buttons, and other elements to determine what resonates best with the audience. This flexibility in testing and optimization can lead to improved conversion rates over time, as you can quickly implement changes based on real user data.
- Improved Tracking and Analytics With a landing page, tracking user behavior and analyzing campaign performance is more straightforward. You can set specific metrics and key performance indicators (KPIs) that align with your conversion goals. This focused approach to tracking allows you to gather more meaningful insights into how visitors interact with the page and what influences their actions, providing valuable data to guide future marketing strategies.
Overall, creating a landing page offers a range of benefits, from enhanced conversion rates and user experience to cost-effectiveness and ease of optimization. It's a strategic tool for focused marketing efforts and a critical asset for driving specific business objectives without the complexity and distractions of a full-fledged website. Now let's see how to create a Landing Page in Elementor in WordPress.
Steps to Create a Landing Page in Elementor
Creating a Landing Page in Elementor involves several critical steps, from setting up your WordPress environment to customizing your design and optimizing for conversions. This guide will provide an in-depth explanation of each step, ensuring you have a comprehensive understanding of the process.
Step 1: Domain, Hosting and WordPress Installation
Before diving into Elementor, the first step in creating a Landing Page in Elementor is setting up a WordPress installation. This process begins with choosing a reliable hosting provider and setting up a domain name. A good hosting provider ensures your website is accessible, fast, and secure, which is crucial for landing page performance and visitor experience.
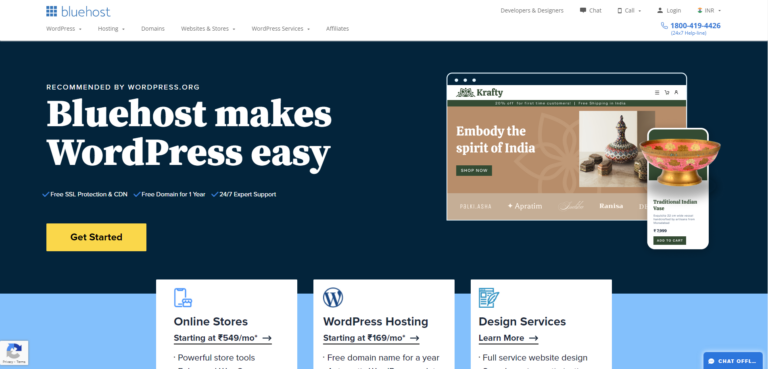
There are many hosting providers to choose from, with Bluehost, SiteGround, and WP Engine being some of the most popular options for WordPress users. These providers offer one-click WordPress installations, making the setup process simple and efficient. When selecting a hosting provider, consider factors like speed, security features, customer support, and scalability to ensure you have a solid foundation for your website.
Once you've chosen your hosting provider, the next step is to set up your domain name. This is your website's address on the internet (e.g., www.yourlandingpage.com). Most hosting providers offer domain registration services, allowing you to purchase a domain during the hosting setup process. It's important to choose a domain name that is memorable, relevant to your business or campaign, and easy to spell.
With your hosting and domain ready, it's time to install WordPress. The one-click installation feature simplifies this task, allowing you to set up a WordPress site quickly. After installation, access your WordPress dashboard to set your site title, configure basic settings, and ensure your WordPress environment is tailored to your needs. Pay attention to time zone settings and permalinks to ensure your site functions correctly and is optimized for SEO. With WordPress installed, you're ready to proceed with creating your landing page using Elementor.
Step 2: Install and Activate Elementor
Once you've set up WordPress on your hosting environment, the next step is to install Elementor pro page builder that transforms how you create and customize web pages. Installing Elementor is straightforward, requiring just a few clicks in your WordPress dashboard.
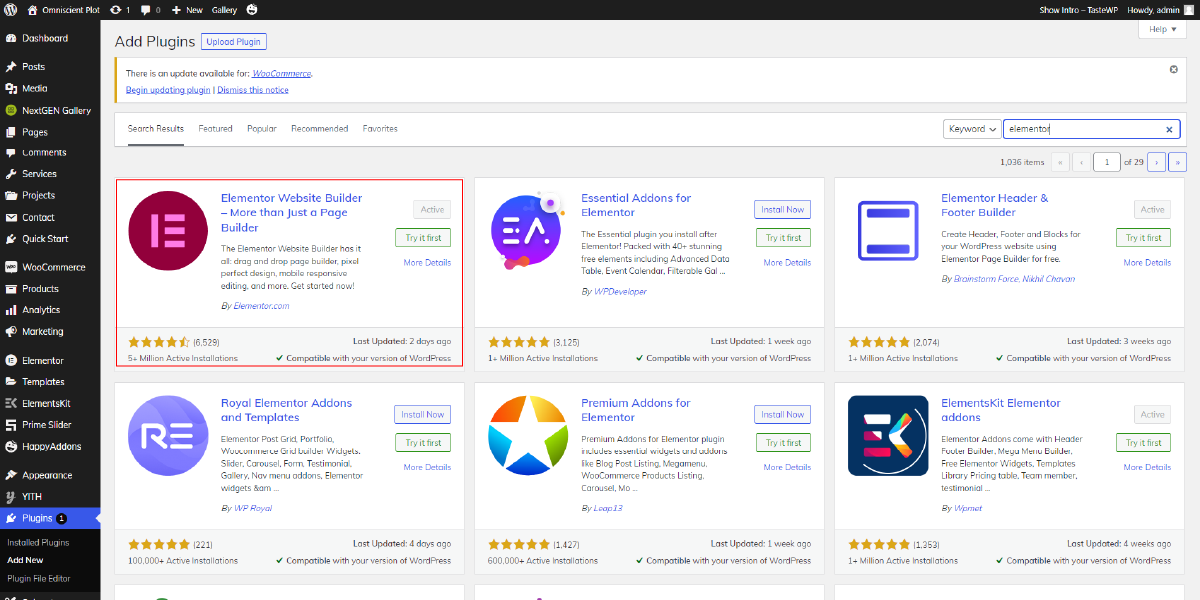
Start by logging into your WordPress admin panel. From the dashboard, navigate to "Plugins" on the left sidebar. Click "Add New" to open the plugin repository. In the search bar, type "Elementor." You'll see a list of results, but focus on the official Elementor plugin, usually among the top results. Click "Install Now" to initiate the installation process. This step might take a few moments, depending on your internet speed.
Once the installation is complete, the "Install Now" button changes to "Activate." Click "Activate" to enable Elementor on your WordPress site. Activation gives you full access to Elementor's powerful features, allowing you to build custom landing pages with its intuitive drag-and-drop interface, extensive widget library, and flexible design options. With Elementor activated, you can start creating stunning landing pages without any coding knowledge, streamlining the entire page-building process.
Step 3: Choose a WordPress Theme Compatible with Elementor

Choosing the right WordPress theme is crucial when creating a Landing Page in Elementor. To ensure a seamless experience and full compatibility with Elementor's powerful features, it's best to select a theme specifically designed to work with this popular page builder. Themes optimized for Elementor are typically lightweight, flexible, and offer a high degree of customization, making them ideal for creating stunning landing pages.
There are both free and Premium WordPress themes that are optimized for Elementor. One reliable source for these themes is WP Elemento, which offers a wide range of themes catering to various business niches. Whether you're building a landing page for a product launch, a service offering, or a personal portfolio, you'll find themes tailored to your specific needs. These themes are designed to be fully compatible with Elementor's drag-and-drop functionality, allowing you to create complex layouts without any coding knowledge.
After selecting a theme that suits your landing page's style and purpose, installing it is straightforward. Navigate to the "Themes" section in the WordPress dashboard, click "Add New," and search for your chosen theme. Once found, click "Install" and then "Activate." With your theme in place, you're ready to start building with Elementor, enjoying the flexibility and compatibility that these optimized WordPress Elementor themes provide.
Step 4: Create a New Page in WordPress

After installing Elementor and activating the theme, the next step in creating a Landing Page in Elementor is to initiate a new page within WordPress. Begin by navigating to the "Pages" section in the WordPress dashboard and selecting "Add New." This action will open a blank canvas where you can craft your landing page from scratch. It's crucial to give your page a descriptive title that encapsulates its purpose concisely. Titles like "Product Launch" or "Newsletter Signup" offer clarity to both you and your visitors about the page's intent.
Once you've named your page, the next step is to enter the Elementor editing interface. Click on the "Edit with Elementor" button, which will seamlessly transition you into Elementor's intuitive drag-and-drop interface. This interface provides you with the tools and flexibility needed to bring your landing page vision to life. From here, you can begin adding sections, widgets, and customizing the design to align with your branding and conversion goals.
Step 5: Choose a Template or Start from Scratch

Elementor offers a diverse selection of templates to kickstart your landing page design process. These templates range from simple and elegant designs to more elaborate layouts tailored for specific industries or purposes. While many templates are available for free, premium templates are also offered as part of Elementor Pro, a paid upgrade priced at $59 per year. These premium templates often feature advanced design elements and customization options, providing even more flexibility for creating visually stunning landing pages. With Elementor Pro you can also use the essential addons for Elementor to get more sections and fuctionality.
To access the template library, simply click the folder icon within the Elementor editor interface. From there, you can explore the various categories and keywords to find a template that suits your landing page's objectives. Each template comes pre-designed with common elements such as headers, call-to-action sections, and image placeholders, making it easy to customize and adapt to your needs.
Alternatively, if you prefer a more personalized approach, you can opt to start from scratch. Elementor allows you to begin with a blank page template or a minimal design, giving you complete control over every aspect of your landing page's layout and aesthetics. This option is ideal for those seeking a unique and custom design that perfectly reflects their brand identity and messaging. Whether you choose a template or opt for a custom design, Elementor provides the tools and flexibility to bring your landing page vision to life.
Step 6: Add and Customize Sections

Once you have your template selected or a blank canvas ready, the next step in creating your Landing Page in Elementor is to start building it by adding sections. Sections are the foundational building blocks of your page, serving as containers for various elements and allowing you to organize content logically. With sections, you can create distinct parts of your landing page that each serve a specific purpose.
To add a section in Elementor, look for the "+" icon in the Elementor editor. Clicking this icon gives you a variety of layout options, such as single-column, two-column, or three-column setups. The layout you choose will depend on the structure you want for your landing page. For example, a single-column layout is ideal for straightforward content flow, while a two-column layout can be useful for displaying content side by side, such as text alongside an image.
After adding a section, you can start populating it with Elementor Woocommerce widgets. Elementor provides a diverse range of widgets to meet your design and functionality needs. You can drag and drop these widgets into your sections to add elements like text, images, buttons, forms, videos, and more. This flexibility allows you to customize each section to fit your landing page's goals.
A typical starting point for a landing page is the hero section, which often includes a captivating headline, a call-to-action button, and a background image or video. This section sets the tone for the rest of the page and is designed to grab visitors' attention. To create a hero section, add a new section with a single-column layout, then insert a heading widget for your headline, a button widget for your call to action, and an image or background widget for visual impact.
As you continue building your landing page, you can add additional sections for specific content. For example, you might include a section with an overview of your product or service, featuring an image or infographic alongside explanatory text. Another section could be dedicated to customer testimonials, using Elementor's testimonial widgets to showcase reviews and build trust.
By strategically adding and customizing sections, you can create a cohesive landing page that guides visitors through your content in a logical and engaging manner. The flexibility of Elementor allows you to experiment with different layouts and widgets, giving you the creative freedom to design a landing page that meets your objectives and resonates with your audience.
Step 7: Customize Design and Layout

Once your sections and widgets are in place, it's time to dive into customizing the design and layout of your Landing Page in Elementor. This step is crucial for ensuring that your page reflects your brand identity and effectively communicates your message to visitors. Elementor provides extensive customization options, allowing you to fine-tune every aspect of your page's appearance.
You can start by adjusting background colors, selecting fonts, and modifying padding and margins to create a visually pleasing layout. Each widget can be customized individually by clicking on it to access its settings panel. From there, you can tweak text content, change colors to match your brand palette, set font styles, and control spacing to achieve the desired look.
Adding animations and transitions can inject dynamism into your landing page, capturing visitors' attention and guiding them towards your call-to-action. Consistency in colors and typography across your landing page creates a cohesive visual experience that reinforces your branding and professionalism.
Moreover, ensuring that your layout is responsive is essential for providing a seamless user experience across different devices. Elementor's responsive design controls enable you to preview and adjust your layout for various screen sizes, ensuring that your landing page looks great and functions optimally on desktops, tablets, and smartphones alike. By paying attention to these customization details, you can create a visually stunning and effective landing page that resonates with your audience and drives conversions.
Step 8: Add a Call to Action

Adding a call to action (CTA) is a next critical step in creating a successful Landing Page in Elementor. The CTA serves as the central directive that prompts visitors to take a specific action, such as signing up for a newsletter, downloading an e-book, or making a purchase. To design an effective CTA button, prioritize clarity and urgency.
Use concise, action-oriented language to create a compelling CTA. Phrases like "Get Started," "Download Now," or "Sign Up Today" communicate a clear message and encourage immediate action. It's important to avoid ambiguity and be direct about what you're asking visitors to do.
Placement is key to a successful CTA. Position your CTA prominently, usually in the hero section or near the top of the landing page, ensuring it captures the visitor's attention as soon as they arrive. Make sure your CTA stands out visually by using a contrasting color or a larger font size compared to other elements on the page. This visual contrast draws the eye and makes the CTA easily recognizable.
To further enhance the effectiveness of your CTA, consider adding directional cues like arrows or imagery that guide the visitor's gaze toward the CTA. These cues create a visual pathway that reinforces the desired action, helping to boost conversion rates on your landing page.
Step 9: Add Supporting Content and Proof

Adding supporting content and proof to your landing page is again an essential step in building credibility and encouraging visitors to take action. While the call to action (CTA) is critical for conversion, additional content can strengthen your message and provide the context needed to inspire trust.
Start by explaining the benefits of your product or service in a clear and concise manner. This could be a section dedicated to listing the key advantages your offering provides. Use bullet points, icons, or concise statements to highlight what makes your product unique and how it solves a problem or fulfills a need. This helps visitors understand the value you offer, making them more likely to proceed with your CTA.
Customer testimonials and reviews are a powerful form of social proof. They offer authentic feedback from real users, reinforcing the credibility of your product or service. With Elementor, you can use testimonial widgets or WordPress testimonial plugins to display these reviews in an attractive and accessible way. Consider featuring customer photos alongside their testimonials to add a personal touch.
Another effective method for building trust is to include logos of well-known clients or media mentions. If your product has been used by reputable companies or featured in major publications, displaying these logos can enhance your credibility. This approach signals to visitors that others have found value in what you offer, making them more likely to engage with your landing page.
Top of Form
Step 10: Publish and Test Your Landing Page

Once your landing page is complete, it's time to publish it. Click "Publish" in the Elementor editor to make your landing page live on your WordPress site. This is the crucial moment when all your design efforts come together to create a seamless user experience. However, before you start promoting your landing page, you need to ensure that everything functions as expected.
Begin by testing your landing page on multiple devices. Open the page on a desktop, tablet, and smartphone to verify that the layout is responsive and adapts properly to different screen sizes. This step is essential because users might access your landing page from a variety of devices, and you want to ensure a consistent experience.
Next, test your landing page across different browsers, such as Chrome, Firefox, Safari, and Edge. This cross-browser testing helps identify any compatibility issues that could affect the user experience. Pay particular attention to interactive elements like buttons, links, and forms. Click on all links to ensure they lead to the correct destinations and test any forms to ensure they're submitting data properly.
Additionally, use tools like Google PageSpeed Insights to evaluate your page's load times. A fast-loading landing page is crucial for keeping visitors engaged and reducing bounce rates. If the page loads slowly, consider optimizing images, reducing script sizes, or implementing caching techniques to improve performance.
By thoroughly testing your landing page across devices and browsers, and addressing any performance issues, you can ensure that your published landing page provides a smooth and consistent user experience for all visitors.
Step 11: Monitor and Optimize Performance

Once you've published your Landing Page in Elementor, the work doesn't stop there. Monitoring its performance is crucial for understanding how visitors interact with the page and determining which elements are driving conversions. Analytics tools like Google Analytics and Hotjar are invaluable for gathering this data, offering insights into visitor behavior, traffic sources, and conversion rates.
With Google Analytics, you can track key metrics like page views, bounce rates, and average time on page. This information helps you gauge overall engagement and identify potential issues, such as high bounce rates indicating that visitors are not finding what they need. Hotjar provides additional insights through heatmaps and session recordings, allowing you to visualize where users are clicking and how they're navigating your landing page.
By regularly reviewing this data, you can pinpoint areas for improvement. For instance, if a CTA is underperforming, consider changing its placement, color, or text. Testing different headlines or imagery can also lead to increased conversions. Implement A/B testing to compare variations and determine which elements resonate best with your audience.
Keep your landing page updated with fresh content, especially if it's tied to ongoing marketing campaigns. This ensures your message stays relevant and aligns with current business goals. Continual monitoring and optimization will help you maintain a high-performing landing page that consistently meets your conversion targets.
Conclusion
In conclusion, creating a Landing Page in Elementor in WordPress is an effective way to focus your marketing efforts and drive specific actions from your visitors. By understanding what a landing page is and how it differs from a full-fledged website, you can appreciate its value in a targeted marketing strategy. The benefits, from higher conversion rates to faster load times, make landing pages an attractive option for businesses and individuals alike.
Following the step-by-step guide to creating a Landing Page in Elementor, you've learned how to build, design, and optimize a landing page that aligns with your goals. From installing Elementor to adding compelling content, customizing the design, and optimizing for conversions, each step contributes to a successful landing page.
Finally, the importance of monitoring and optimizing your landing page cannot be overstated. By using analytics tools and regularly reviewing performance, you can ensure your landing page remains effective over time, adapting to changing trends and user behavior. Now you're ready to create landing pages that not only look great but also deliver results. Happy building!
